How To Make Self Balancing Robot Using Arduino UNO
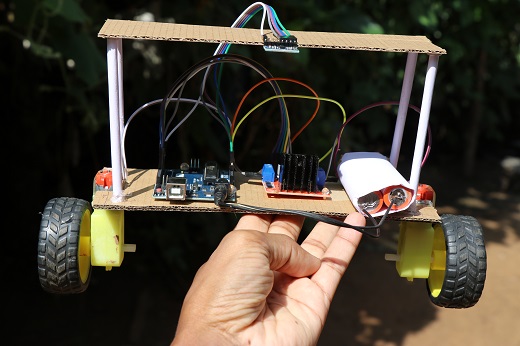
Hi, In this article I will be showing you in very detailed steps along with codes and circuit diagram How to make self balancing robot using Arduino, which is one of the best projects using Arduino.
Here we are using combination of sensors and micro controllers along with movements of wheels and body so that perfect balance is maintained.
What is Self Balancing Robot?
Self balancing is a general word, meaning something which can balances itself, here we are using combination of Arduino, gyroscopic sensor and motor driver to balance/stabilize our two wheeled robot. Here the theory behind it’s working principle is called inverted pendulum theory.
How our self balancing robot using Arduino works?
When the robot is switched to on position Gyroscopic sensor starts monitoring its position in real time, always it should be centered by default , if it detects any changes immediately those changes in signals will be sent to Arduino board(all these instructions are given in Arduino codes and many of parameters can be changed in code) which will ask DC Motors to align as per center position of gyroscope sensor.
NOTE: Here the challenge is when the gyroscope sensor hardware is placed in it’s position (fixed) on this robot make sure it’s placed on very level surface (in short it should be centered) if its not centered dc motors will rotate continuously without any control!
Materials to make self balancing robot using Arduino
Arduino Uno you can also use Arduio nano too, but some changes in connections and codes need to be made
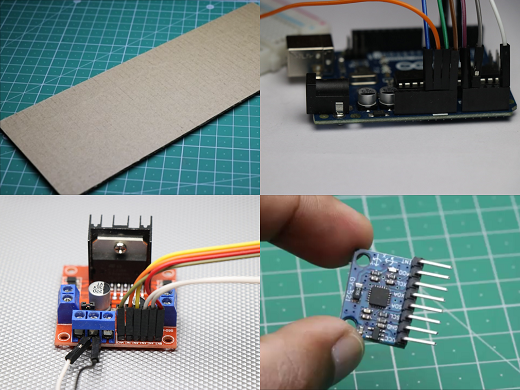
Piece of cardboard,I will be using 27cm*8cm rectangular piece
Dual shaft Gear Motor some call it as BO Motor and L298N Motor driver
Gyroscope + Accelerometer module I am using MPU-6050
Hot glue , Jumper wires and other small supporting accessories
| Name of Component | Buy in India | Buy in USA |
| Arduino UNO | https://amzn.to/3kbjZL2 | https://amzn.to/3buKSoW |
| Geared Motor | https://amzn.to/37yNuRL | https://amzn.to/3uumNaO |
| Motor Driver | https://amzn.to/3sewGat | https://amzn.to/3aGgJUC |
| Gyro sensor | https://amzn.to/3aEW8QL | https://amzn.to/3s6KX9g |
Disclosure: These are affiliate links. As an Amazon Associate I earn some credits from qualifying purchases.
Building Main Frame/Body
To build main frame I will be using Pieces of cardboard which are precut alternatively MDF Wood or Plexiglass can be used.
Please follow steps below for building main frame
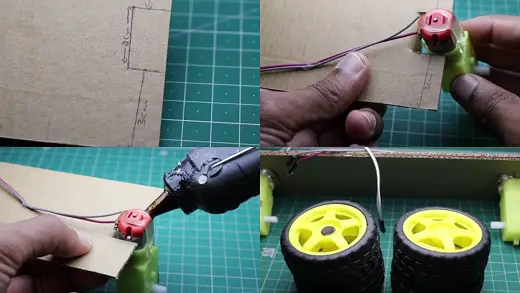
Cardboard of length 27cm*8cm is cut, We don’t want any changes to be made across length of cardboard (27cm part), Make 3 divisions on breadth side
3cm on either sides in between a 2cm line so in total 8cm, Cut 1.5cm deep across 2cm line (please refer images), Check if the Gear motor fits
If it fits inside that slot, Using Hot glue stick BO motor( dual shaft dc motors) to frame make sure to fix everything without any loose connections (or else it might cause problems later)
Repeat same process on other side also
CIRCUIT DIAGRAM for self balancing robot
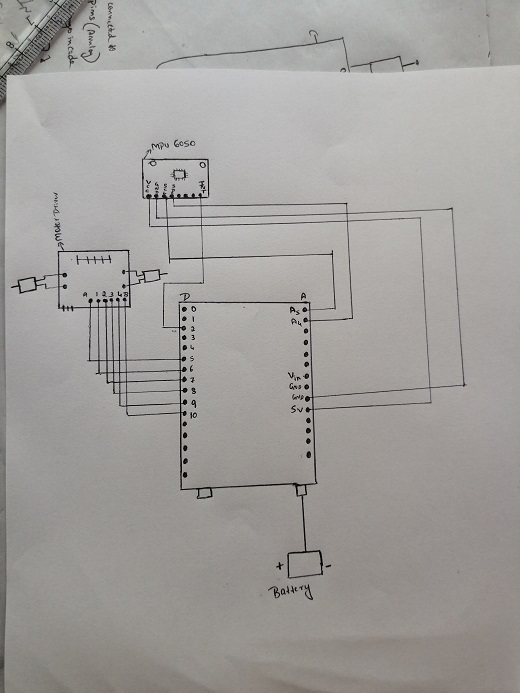
Making Connections with Arduino uno
- MPU 6050 ( connection to analog pins in arduino)
- Vcc to 5v in arduino
- Gnd to Gnd
- SCL to A5 of arduino
- SDA To A4
Motor Driver Connections ( Connection to digital pins in Arduino)
- Ena to D5 of arduino
- IN1 to D6
- IN2 to D7
- IN3 to D8
- IN4 to D9
- Enb to D10
Codes for making self balancing robot using Arduino
Once all the circuit connection is made connect Arduino board to your computer
Open Arduino IDE and Copy paste the codes, Before clicking on upload check these things
Port number will be selected by default, if it’s not selecting goto device manager
Universal serial bus controllers ->there will be caution symbol for Arduino board -> click on It -> browse for available drivers in your computer option -> Go to your Arduino file path->select drivers and press ok->that’s It
Now add port and click on upload also make sure you have Arduino library installed for motor driver and gyroscope + accelerometer module. if it’s not install search for same and install library to your Arduino IDE
Once you upload the code it’s time to build supporting structure to place all these electronic components
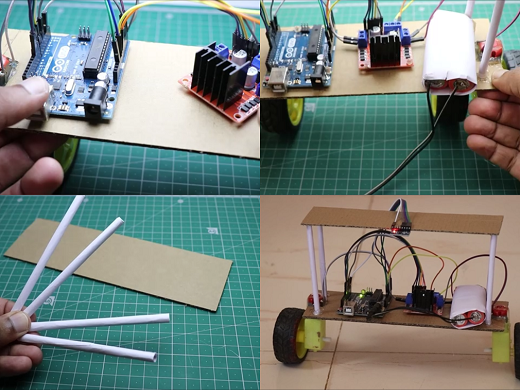
Our frame has 2 layers First layer is for supporting arduino board, l293d motor driver and rechargeable lithium ion battery
Second layer we are placing MPU 6050 (gyroscopic + Accelerometer) sensor
Steps for making Second layer frame
i measured 21cm * 7cm cardboard piece Roll of paper measuring 10cm will be use along side supports
This should be glued to first layer using hot glue Setup gyroscopic sensor on top of second layer, please follow steps to place sensor correctly
Center of mass matters here Balance the robot first later fix MPU 6050 on top of second frame Refer images for much more clear instructions
Note: Before installing (gyroscopic + Accelerometer) sensor in short MPU6050 make sure all the components in first frame is placed accordingly to per their weights, Keeping all the electronic hardware in same place would cause imbalance in the system, so that even if Gyroscopic sensor was placed on level surface while all these are placed randomly this robot will not working effectively.
Tip: Make sure everything is balanced perfectly
How to know if sensor is calibrated properly?
Use spirit level as a reference Compass sensor in your smartphone does the job too!
Keep either of this in second frame and obtain the center position by moving the robot back and forth
Now lets talk about Advantages and Disadvantages
Advantages
Very Easy to Build with Less Building cost
Enhances learning various concepts of Arduino and expose to its applications and Ideal for mini engineering projects
Disadvantages
Movements would be more precise if stepper motors used (cost may go high) also Beginners might find difficult to build
Applications
We can’t mention any specific application as this is a robot there might be having one or the other application one related example which I would like to mention is in area of transportation
Self balancing Segway will work on same principle but with changes in electronic components for much precise movements
Hope you enjoyed this idea, you can use this as your mini engineering projects or for any science exhibition because this project covers multiple aspects in areas of physics and mechatronics for instance
Balancing the robot and other electronic components comes under areas of physics(center of gravity), similarly combination of electronics(arduino, sensor and driver) and mechanics(dc motor movements) , So in whole you will have very much good idea regarding all these concepts.
Any Queries?
Comment box is Free! Thank You


